
Morel Lookalikes: False Morels, Caps, Stems, and Safety Clues
Learn which visible clues separate true morels from lookalikes, what a photo can actually prove, and the safe next steps to take when you’re not sure.
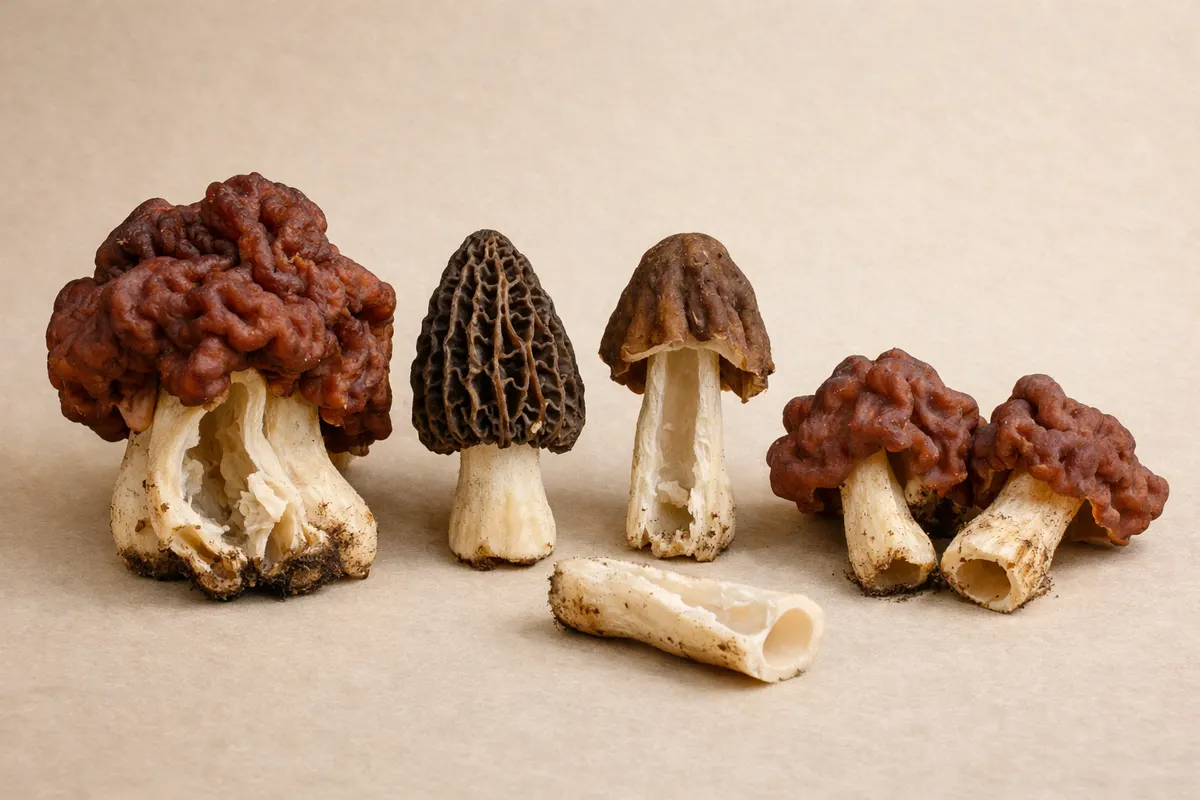
Quick answer: what a photo can tell you about morel lookalikes
Morel lookalikes are a common source of confusion: some false morels (Gyromitra, Verpa and others) can mimic the overall honeycomb or sponge-like appearance of true morels at a glance. A single photo can often separate obvious fakes from likely true morels, but it rarely provides definitive proof. Use images to check a short list of field marks that tend to be stable in ordinary phone pictures—cap attachment, overall cap texture, and whether the stem is hollow are the most informative at first glance.
If a mushroom shows a distinctly cerebriform (brain‑like), lobed, or folded cap rather than a regular, pitted honeycomb, treat it as a potential false morel until more evidence is collected. Likewise, a stem with chambers, cottony interior, or a cap that hangs like a skirt usually points away from a true morel. These are strong visual clues you can often confirm with two or three complementary photos.
However, do not rely on color, a single angled shot, or a memory of where you picked the mushroom to decide safety. A practical next step after photographing the specimen is to gather a short set of context shots and to use them as research notes: compare multiple visual clues together, consult trustworthy references, and if you still have uncertainty, consider leaving the mushroom alone. Photos are best used to narrow possibilities, not to declare edibility or toxicity.
Most reliable visual clues for spotting morel lookalikes
When you’re trying to separate true morels from lookalikes, prioritize clues that survive poor lighting, slight blur, and common phone-camera angles. The three most durable checks are cap structure and attachment, stem interior, and cap surface pattern. Together these clues reduce ambiguity more than color, size, or a single reference photo ever will.
Cap attachment: In true morels (Morchella spp.) the cap is typically fused to the stem at least near the base of the cap; the cap appears as a continuous honeycombed cone seated on the stem. Verpa species often have caps that hang freely like a skirt, attached only at the apex. Gyromitra and some other false morels have brain- or saddle-shaped caps with folds and lobes rather than the distinct pits and ridges of true morels. A close side shot that shows where cap meets stem is one of the clearest single-photo tests.
Stem interior and texture: A hollow stem running continuously into the cap is classically described for true morels. If you can safely and ethically provide a clean longitudinal photo of the interior (for example, from an already‑cut specimen), look for a completely hollow chamber from base to cap. False morels often show cottony, chambered, or filled stems that look segmented or stuffed. This check is stronger than color: an off‑color hollow morel still reads differently than a solid, fibrous false morel.
Cap pits and ridges: True morels show relatively organized, repeating pits and ridges on the cap surface—irregular but with a recognizably pitted honeycomb appearance. Gyromitra caps are more irregular, with smooth folds or brain-like convolutions rather than open, angular pits. When photographing, aim for a head-on and an angled close-up of the cap to capture the three-dimensional pattern of pits versus folds.
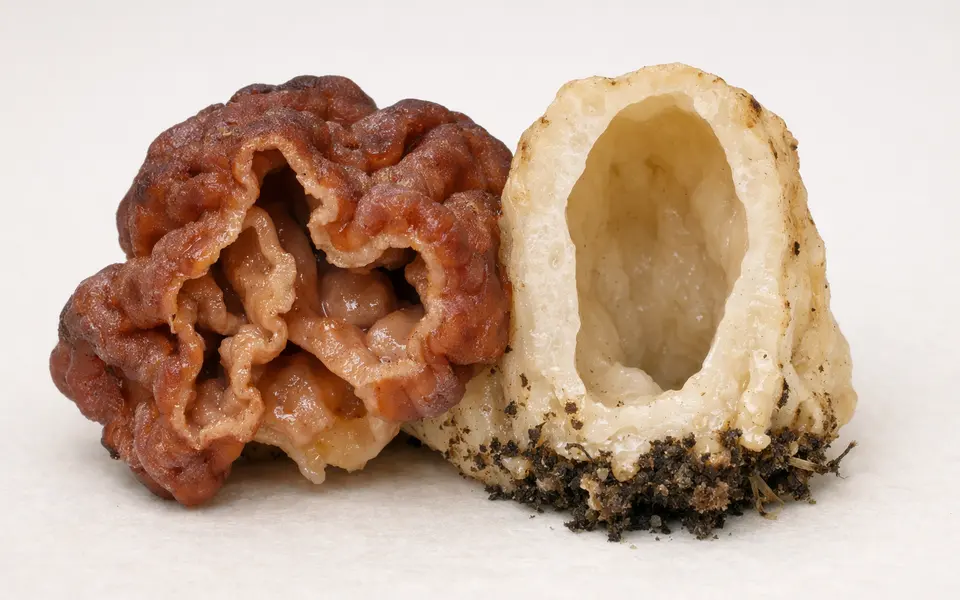
- Cap attachment: fused, seated cap = morel; hanging/skirted cap = likely Verpa or other lookalike.
- Stem interior: continuous hollow stem (true morel) vs. chambered, cottony, or filled (risk for false morel).
- Cap surface: repeating pits and ridges suggest true morel; brain-like folds or saddle shapes suggest Gyromitra or related species.
- Base and root collar: look for consistent hollow cavity extending to the base; swollen or rooty bases can indicate a different taxon.
- Context: season (spring) and local habitat help, but they are supportive clues—not proof.
Weak signals: what photos often mislead about morel lookalikes
Certain features are poor discriminators in photographs. Color, overall size, surface gloss from rain or dew, and a single oblique angle are all weak signals. Color varies with humidity, age and light; some true morels darken as they mature and some false morels can be light‑colored in dry sites. Relying on color alone is a common source of misidentification.
Glare and shadow can hide cap structure. A wet cap reflects light and can smooth out the appearance of pits, making a true morel look like a brain‑folded Gyromitra, or vice versa. The same is true for overly close macro shots that capture scale without showing how pits and ridges connect across the cap. Always include a mid-range shot for context when you photograph a suspected morel.
Context alone—where you found it or what trees were nearby—can be suggestive but not decisive. For example, Verpa bohemica often grows on ground near trees in spring, which overlaps with true morels’ season and habitat; habitat is a supporting clue, not a replacement for structural checks. If you want a deeper read on safety limits and when to stop relying on photos, the guide “How to Identify Poisonous Mushrooms: Warning Signs and Safety Limits” provides a broader view of risk factors: https://mushroomidentification.app/blog/how-to-identify-poisonous-mushrooms.
Finally, beware single‑feature rules that sound simple—like 'all hollow stems are safe' or 'all brainy caps are poisonous.' These rules fail in edge cases and with damaged or immature specimens. Treat single features as a prompt to collect complementary evidence, not as a conclusion.
- Color and maturity: variable and unreliable as sole evidence.
- Single-angle photos: miss attachment and 3‑D pit structure.
- Wet or dirty caps: reflections and debris disguise pit vs. fold patterns.
- Nearby trees and season: helpful context but not proof of species.
A step-by-step comparison workflow for likely morels
A reliable workflow uses multiple independent clues in sequence so that each step either raises or lowers confidence. Start with the easiest, least invasive checks that you can capture in photos: cap attachment and overall cap pattern. Next, add stem and interior information, then check context and season. When these elements point in the same direction, the specimen is more likely to be a true morel; when they conflict, treat the ID as uncertain.
Step 1 — Cap attachment and silhouette: Take a side photo that clearly shows where the cap meets the stem. If the cap appears glued down or continuous with the stem at multiple points, mark that as a true‑morel indicator. If the cap hangs or looks like a separate skirt, mark that as a Verpa or lookalike indicator.
Step 2 — Close cap detail: Photograph the cap surface at close range and at a slight angle so pits and ridges cast small shadows. A pitted honeycomb with open pockets is consistent with Morchella. Convoluted, smooth waves or saddle‑like lobes suggest Gyromitra or other false morels.
Step 3 — Stem interior: If you can ethically and safely examine a cut or naturally split stem, a continuous hollow interior is a strong supportive clue for true morels. If the stem shows cottony tissue, internal chambers, or solid fibrous fills, treat it as a red flag.
Step 4 — Synthesize habitat and timing: Combine the visual evidence with season and substrate. True morels commonly fruit in spring in temperate zones, often near hardwoods or in recently disturbed ground; Verpa and Gyromitra species may overlap but sometimes show distinct microhabitat preferences. Use these ecological notes as tiebreakers, not as primary evidence.
When your photos and notes still leave room for multiple likely identities, annotate the evidence and either seek an experienced local mycologist or choose the conservative action: do not eat. Documenting each step with labeled photos creates a useful research record whether you consult an expert or use an identification tool.
- Step 1: Side shot showing cap-stem junction.
- Step 2: Close angled shot of cap pits/ridges.
- Step 3: Longitudinal view of stem interior if available.
- Step 4: Note season, substrate, and nearby trees; use as supporting evidence.
How to use the app after you collect morel lookalike clues
After you’ve collected a short set of photos and notes using the checklist above, use Mushroom Identifier: Fungio as a first‑pass research step—not as the final verdict. The app is most helpful when you feed it multiple, labeled photos: a side shot showing cap attachment, a close cap detail, a stem interior shot (if available), and one context image showing substrate and nearby trees. These images let the tool compare visual patterns across different parts of the mushroom rather than relying on a single ambiguous frame.
Label each photo on your device with a short note (for example: 'side cap attachment,' 'cap detail,' 'stem inside,' 'site view') so that any automated suggestions or human reviewers can quickly see which clue each image represents. Because web upload of photos to this site is not supported, keep your images on your device and use the app’s in‑device scanning or camera interface to analyze them. Treat the app output as a set of hypotheses to check, not a guarantee.
When the app suggests likely matches, re-run the comparison workflow against the suggested species: do the cap attachment and stem interior align with the app’s candidate? If the app and your visual checklist agree, confidence grows; if they conflict, lean conservative. For any remaining uncertainty, save the photos and notes as a dated record and consult a local mycological group or an experienced identifier before considering any riskier action.
Practical notes on safety and follow-up: never base an eating decision on an app result alone. The tool is useful for research and narrowing possibilities, and the best outcomes come from combining app hypotheses with careful field evidence. If you want a broader discussion on warning signs and safety limits, consult the linked safety guide: https://mushroomidentification.app/blog/how-to-identify-poisonous-mushrooms.
- Collect at least four labeled photos: side view, cap detail, stem interior, and context.
- Use the app on your device (camera/scan) as a research step—do not treat app results as definitive.
- Compare app suggestions to your checklist; give more weight when independent clues match.
- If doubts remain, keep the specimen documented and consult a local expert rather than guessing.
Related guides
Check your morel clues in Fungio before you decide
After you’ve photographed cap attachment, cap detail, stem interior, and the surrounding site, use Mushroom Identifier: Fungio on your device as a focused research step. Feed the app labeled photos from your camera roll or scan them in the app so its suggestions can be compared to the field clues you collected. Treat any app result as a hypothesis to verify — keep your labeled photos, double‑check cap and stem features, and consult a local expert if uncertainty remains. Fungio helps organize your evidence and narrows possibilities, but it isn’t a substitute for careful field checks and conservative decision making.
Take the next step →Frequently asked questions
How can I tell a true morel from a false morel with a photo?
Start with three photo checks: cap attachment, cap surface pattern, and stem interior. A true morel usually has a cap that appears fused to the stem with a repeating pitted honeycomb surface and a hollow stem that continues into the cap. False morels often have brain‑like folds, saddle‑shaped lobes, or a skirted cap and may show internal cottony tissue or chambers. Use complementary photos—side view for attachment, close-up for pits, and a longitudinal view for the stem—because each check supports or contradicts the others.
Is a hollow stem always proof that a mushroom is a true morel?
No. A hollow stem is a strong supporting clue for true morels, but it is not absolute proof on its own. Some lookalikes can have hollow sections or may be damaged and appear hollow. Also, young or rotten specimens change internally. Always pair a hollow‑stem observation with cap attachment and cap surface checks. If any of those other features conflict, treat the ID as uncertain.
Can I rely on color or size to identify morels from a photo?
Color and size are weak signals for morel identification. Both traits vary by age, moisture, and lighting. A small, dark morel might be a mature Morchella or a compact false morel; a large pale specimen could be a true morel in a different growth phase or a different species altogether. Use color and size only as supporting context after confirming structural features such as pits, ridges, and stem interior.
What should I do if the photo evidence is ambiguous?
If photos leave you with conflicting clues, choose the conservative path: do not harvest for eating. Save and label your photos, note the date and habitat, and consult an experienced local mycologist or identification group. You can also use an identification app as a research tool to generate hypotheses, but treat its suggestions as starting points for further evidence gathering. When in doubt, leaving the specimen alone avoids unnecessary risk.