
Bolete Identification: Pores, Bruising, Stem, and Cap Clues
Learn which bolete identification clues a photo can show, which ones are unreliable, and practical next steps to narrow likely matches safely.
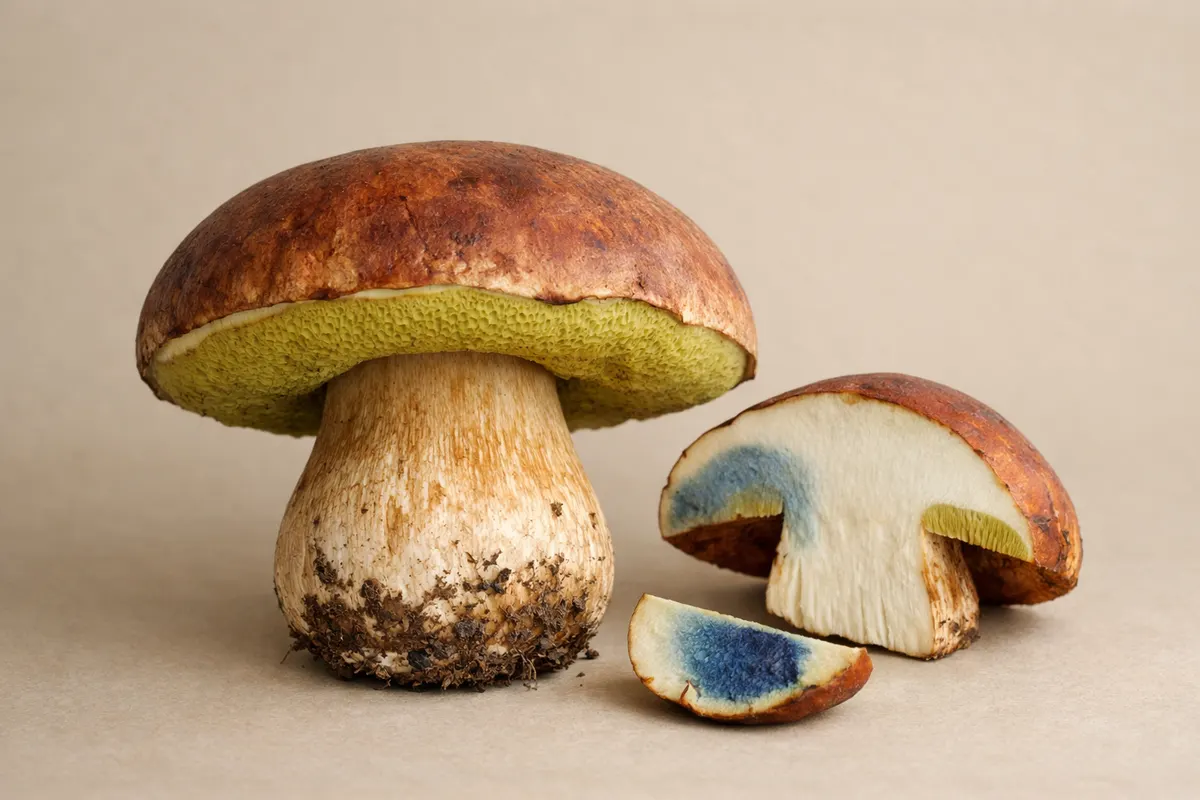
Quick answer: what photos can show for bolete identification
Bolete identification hinges on a handful of field marks you can usually capture with a smartphone photo: the pore surface (underside), bruising reactions, stem texture and ornamentation, cap surface and margin, and the ecological setting. A single clear photo that includes the underside and a stem close-up can immediately rule out wide groups of lookalikes and point toward likely genera such as Boletus, Suillus, Xerocomus, or Leccinum.
Photos rarely give proof of species on their own. For many boletes, the combination of pore color and bruising response narrows the candidate list to a handful of plausible species. Conversely, traits that require smell, taste, microscopic spore details, or chemical tests cannot be confirmed from images alone. Treat photographic evidence as a prioritized shortlist, not a final answer.
Practical takeaway: use photos to collect strong, repeatable clues first (pores, bruising, stem features, cap texture, and habitat). Record what you photographed, note uncertainty, and use those clues to compare likely matches before relying on any single identification.
- Essential photos: top of cap, underside (pores), stem side, cut/bruise reaction, and surrounding habitat.
- Key instant clues: pore color, bruising color and speed, stem ornamentation (reticulation, scabers), and cap surface texture.
- Limitations to note: spore print color, microscopic features, and chemical tests can’t be verified from a photo.
Most reliable visual clues for bolete identification
When working from photos, some traits are much more robust than others because they survive lighting and angle changes. Start with the pore layer: whether pores are round, angular, or forked; their density (pores per mm); and their color at maturity. Pore color changes through development, but the adult pore color together with whether pores bruise a different color is a high-value combination for narrowing species.
Bruising reaction is the next strong clue. Many boletes show rapid blue staining when cut or handled; others bruise yellow, brown, or not at all. Two details to record in photos are the immediate color change and how the color develops over minutes to an hour. Capture a short time-lapse or at least a second photo a few minutes after cutting so readers can see the reaction progress.
Stem features often separate close lookalikes. Look for reticulation (a net-like pattern), vertical scabers or flakes, base shape, and any rooting or bulbous base. Take a side-on photo that shows the stem in full, plus a close-up of the stem surface. A reticulated stem combined with a non-bruising pore layer tends to point to particular Boletus sensu lato groups, while scabers signal genera like Leccinum.
Cap surface and margin give additional anchoring evidence: whether the cap is viscid or dry, cracked or smooth, zoned or uniform, and whether the margin is inrolled in young specimens. Habitat is a stabilizing context clue—note the tree associates (conifer, oak, birch), substrate (soil, duff, rotting wood), and whether the bolete appears solitary, clustered, or in rings.
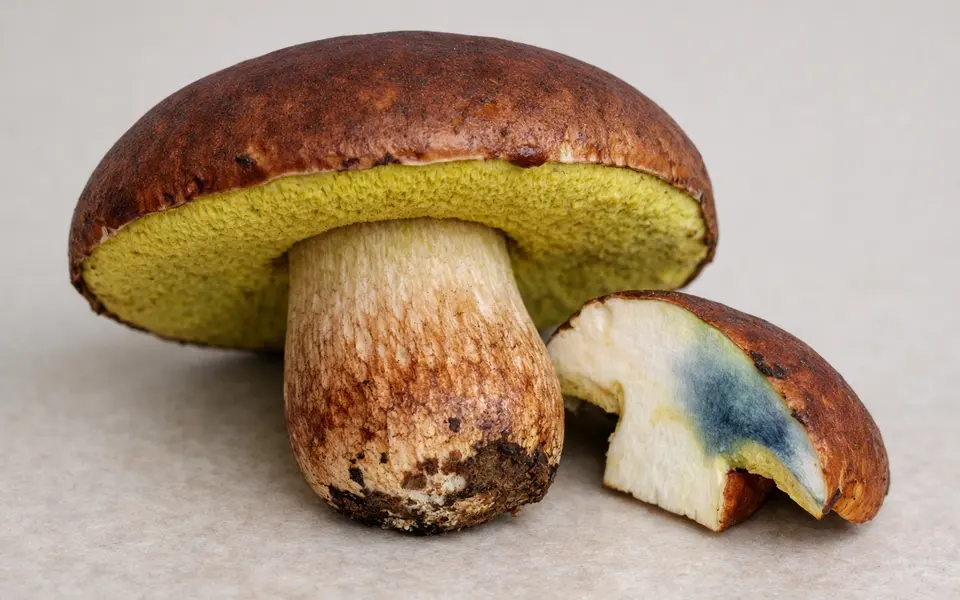
- Pore layer: density, shape (round vs angular), and color at maturity.
- Bruising: immediate color, development over minutes, and intensity.
- Stem: reticulation, scabers/scales, base shape, and attachment of pore layer.
- Cap: viscid vs dry, surface texture (cracked, smooth, velvet), margin shape.
- Habitat: tree association, soil type, and nearby vegetation.
Weak visual signals to treat cautiously in boletes
Color alone is one of the weakest clues for bolete identification because lighting, camera white balance, age, moisture, and regional color variation can all change appearance. Brightly colored pores or caps in a single photo can be useful as a prompt, but should never be relied on without cross-checking bruising, stem structure, and habitat. For example, a damp, oily cap will look darker and glossier than the same species in dry conditions.
Shallow or vague patterning is another trap. Slight zonation, subtle spotting, or minor surface cracking often vary with age, weather, or abrasion from soil and leaves. A single close-up that emphasizes one area may miss the overall cap pattern; always photograph both the whole cap and a detail crop so you can judge whether a local mark is representative.
One-angle shots of pores or bruises are risky. Bruising reactions can start at different intensities across the pore surface and may be masked by rapid oxidation or sunlight. Similarly, reflections and glare on a wet pore surface can mimic color changes. When possible, record the bruise on both a cut surface and the pore face, and take photos in diffused light or shade.
- Avoid relying on cap hue or saturation from a single photo.
- Do not make species claims from subtle or localized patterns.
- Watch for glare, shadowed pore photos, and compressed perspective that hides stem texture.
- Do not infer scent, taste, or spore details from photos—these require in-person checks.
How to compare bolete matches step by step
Treat bolete identification as a process of elimination. Start by dividing candidates at a genus level using the most robust visible clues: pore color and structure, bruising reaction, and obvious stem characters. For example, if the pore surface is large-poroid and turns blue almost instantly on handling, you can deprioritize genera that rarely bruise blue and focus on blue-staining groups.
Next, compare ecological context. Many boletes are ectomycorrhizal with specific tree partners—Leccinum species are commonly associated with birch, while many Suillus species favor pines. If your photos show clear proximity to a single tree species, weight that heavily in your comparison. Conversely, mixed stands or ambiguous photograph framing should reduce confidence in habitat-based assumptions.
Then check secondary traits: cap texture (velvety vs viscid), stem reticulation pattern, presence or absence of a partial veil, and whether the pore surface separates from the cap flesh easily. Use these traits to discard mismatches from your shortlist. Keep notes of which traits you used to exclude each candidate—this transparency helps if you later consult an expert or use an identification app.
Finally, assemble a ranked list of likely species and the remaining uncertainties for each. For candidates with different bruise colors or different stem ornamentation, note those contradictions clearly. If two species differ only by microscopic spore shape or chemical reaction, mark them as indistinguishable from photos and plan follow-up steps like spore prints or consulting a local mycologist.
- Step 1: Use pores + bruising + stem to place the specimen into a small genus group.
- Step 2: Confirm or refute tree association visible in photos (conifer vs deciduous).
- Step 3: Apply cap and stem micro-features visible in photos to narrow species.
- Step 4: Make a ranked shortlist and document traits that remain uncertain.
Using an app after your bolete clue checklist
Once you’ve captured the essential photos and assembled a short list of candidates, an identification app can be a helpful next pass to compare images and common matches quickly. Enter the same key traits into the app where possible: pore color, bruising behavior, stem ornamentation, and tree association. The app’s suggestions should be treated as hypotheses to test against your own evidence, not final determinations.
When you use an app, include multiple images that show different clues rather than a single hero shot—the underside, stem close-up, and a cap overview help the algorithm weigh the same features you did in the field. Because automated suggestions can be biased by database composition, weigh matches that align with your recorded bruising, pore description, and habitat higher than matches that fit only by cap color.
If the app suggests several likely species, return to your photo checklist and look for decisive small differences: reticulation scale size, the precise shade and timing of bruising, and whether pores are decurrent or free from the stipe. For any remaining uncertainty, record the app results as tentative research notes and consider follow-ups such as a spore print, microscopic checks, or a local expert opinion.
For more general guidance on visual clues and lookalikes, consult practical resources like Mushroom Visual Checklist: Common Clues, Lookalikes, and Next Steps or the broader Mushroom Identification Guide: Cap, Gills, Stem, Habitat, and Spore Print to ensure you’re comparing the same traits across sources.
- Upload multiple photos to the app but avoid treating suggestions as definitive.
- Prioritize matches that agree with your bruising and pore observations.
- Record app suggestions alongside the photographic evidence you used.
- Plan follow-ups if the app indicates species that require microscopic or chemical confirmation.
Related guides
Use Mushroom Identifier: Fungio after your bolete checklist
After you’ve captured pores, bruising, stem details, and habitat photos, try Mushroom Identifier: Fungio on your device to compare likely matches quickly. Treat the app’s suggestions as research leads: keep your original photos, note which traits you relied on, and follow up when species-level confirmation would change how you act. If uncertainty remains, supplement app results with spore prints, microscope checks, or a local expert.
Take the next step →Frequently asked questions
Can I identify a bolete to species from one photo of the cap?
Not reliably. A cap photo shows surface color and texture, which helps narrow possibilities, but many bolete species share similar caps. To move from genus-level guesses to species, you usually need pore/underside photos, bruising reactions, stem detail, habitat notes, or spore prints. Treat a single cap image as an initial clue, and collect underside and stem photos before concluding.
How long should I watch a bolete for bruising reactions and how should I record it?
Observe bruising immediately and for at least 10–20 minutes, photographing the same spot at intervals (immediate, 2–5 minutes, and 15–20 minutes). Some reactions are near-instant blue stains; others develop slowly from yellow to brown. Photographing the sequence documents speed and peak color, both of which are often more diagnostic than the final faded color.
What stem features are most useful from photos for bolete identification?
Photograph the stem from several angles: a full-length side view to show shape and base, a close-up to reveal reticulation, scabers, or fibrils, and the point where the pore layer meets the stem. Reticulation (a net-like pattern) versus scabers (pointed scales) is a major diagnostic difference. Also note whether the stem bruises and whether any color patterns change with age or damage.
When should I stop relying on photos and seek lab or expert help?
Seek expert or lab help when identification depends on spore morphology, microscopic cystidia, or chemical reactions, or when species are known toxic lookalikes that require confirmation. If your photographed clues leave multiple candidates that differ by microscopic or chemical features, arrange a spore print, a microscopic exam, or consult a regional mycological society before using the mushroom for any purpose that depends on exact species identification.