
How Do I Identify A Mushroom
Learn which how do i identify a mushroom details a photo can prove, which it cannot, and the follow-up checks worth doing before you rely on the answer.
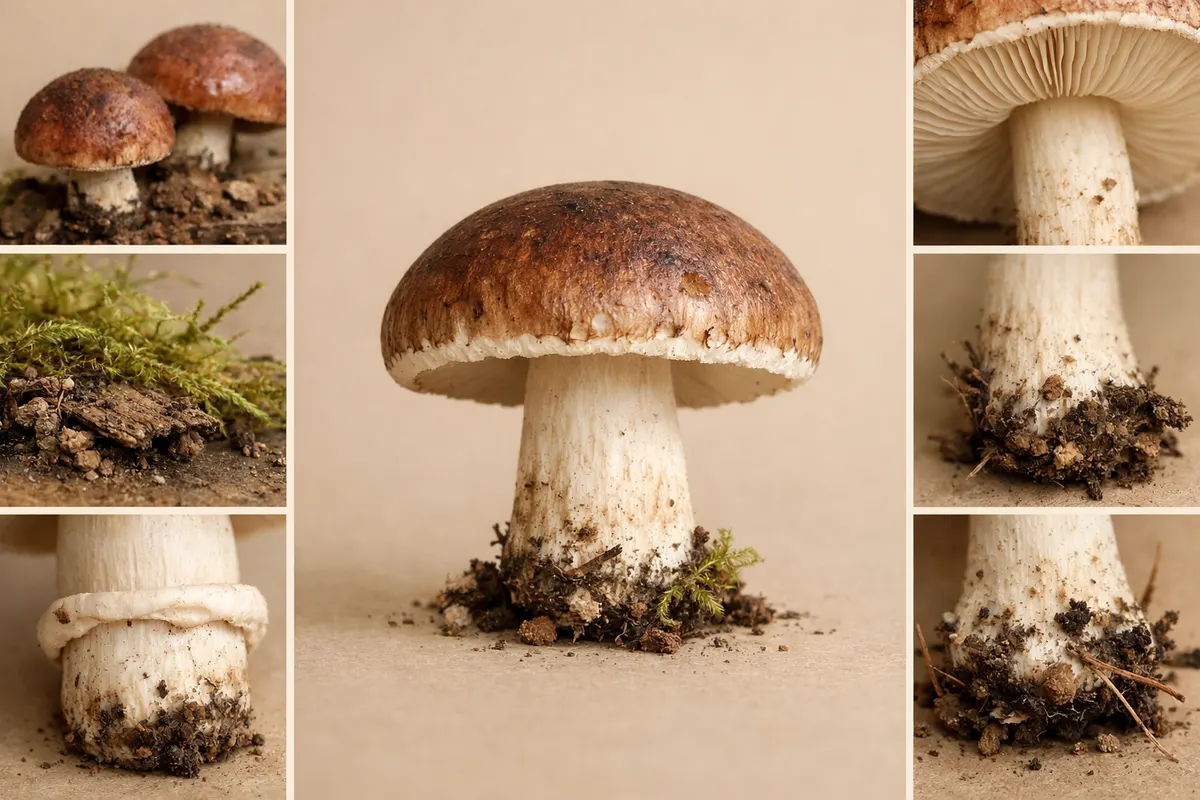
A quick, practical answer to how do I identify a mushroom
If you’re asking how do I identify a mushroom, start with a simple rule: a reliable identification depends on a set of field marks, not a single snapshot. Useful photos and habitat notes can often narrow a mushroom to a small group or a likely species, but some lookalikes remain ambiguous without a spore print, smell test, microscopic features, or expert verification.
In practice, a strong first-pass identification comes from combining visible traits—cap shape and color, gill or pore structure, stem features, presence of rings or a volva, and where it’s growing—with context like season and substrate. For many common species (for example, field puffballs, the classic fly agaric Amanita muscaria, or chanterelles), clear photos of key angles plus habitat notes will point strongly toward a correct name.
However, be cautious: some poisonous mushrooms mimic edible ones closely. Treat every suggestion as a hypothesis: use photos and the checklist below to reduce possibilities, then confirm with additional checks, a regional field guide, or a local expert before deciding anything that affects safety.
- Photos + habitat = good first-pass narrowing, not a guaranteed ID.
- Key visible marks: cap, gills/pores, stem, attachments, surface texture.
- When in doubt, stop: don’t taste, eat, or assume safety from a photo alone.
What identifying a mushroom really means
Asking how do I identify a mushroom is asking how to match observations to a taxonomic concept. In field practice that means gathering visible traits (the mushroom’s field marks), matching those against known species descriptions, and evaluating how well the match fits regionally and seasonally. Identification is a probability exercise: some matches are high-confidence, others are plausible but uncertain.
A full identification workflow moves from broad to narrow: first decide whether the fungus is a bracket, puffball, bolete (pores), agaric (gills), or coral fungus, then evaluate finer details like gill attachment, spore color, bruising reactions, and specialized structures such as volvas or rings. Combining multiple independent clues increases confidence more than relying on one striking feature.
Concretely, finding a white, smooth-capped mushroom with a volva at the base, white gills, and a ring narrows you toward the Amanita group—some species of which are dangerously toxic. Conversely, a bright orange gilled cluster on wood with true forked gills points more toward the Jack-o’-lantern (Omphalotus) group or certain Hygrophoropsis species. Knowing which features matter reduces dangerous errors.
- Identification = matching multiple independent field marks to reduce ambiguity.
- Start broad (group by growth form), then refine with cap, gill/ pore, and stem details.
- Context—where and when it grew—often eliminates many lookalikes quickly.
Key clues to check when identifying a mushroom
When you’re trying to answer how do I identify a mushroom, prioritize field marks that are both easy to observe and diagnostically powerful. Below are the highest-value clues to collect in the field and photograph when possible. Each clue cuts the candidate list more than a single color or size note.
Photographing and recording these clues in a consistent order makes later comparison far easier. A set of clear photos of the cap from above, the cap margin, the underside (gills, pores, spines), the full stem from top to base (including digging up a little soil to show the base when safe), and the surrounding substrate is the baseline for a useful record.
Keep in mind that some traits change with age or weather: caps fade, gills darken or dry, and bruising can appear only after scattering. Note both fresh condition and any changes observed when the specimen is disturbed or cut, because reactions like color change or latex exudation are often decisive.
- Cap: shape (convex, bell, flat, funnel), texture (smooth, scaly), margin details, and diameter.
- Underside: gills vs pores vs teeth; gill attachment (adnate, decurrent, free); gill spacing and color.
- Stem: surface texture, presence of a ring or skirt, base shape (bulbous, tapered), and any volva or cup.
- Spore print color: white, cream, pink, brown, black, chocolate, or olive—very diagnostic for many groups.
- Surface reactions: bruising color (blue, red, yellow), latex or sap exuded when cut, and odor (mild, fruity, anise, foul).
- Habitat and substrate: on wood (species of tree if known), soil, moss, dung, lawn—species often specialize by substrate.
- Season and location: month, elevation, and region narrow the species pool dramatically.
- Size and context: measure cap diameter and stem length and note whether specimens are solitary, clustered, or in rings.
A step-by-step workflow to identify a mushroom from photos
Answering how do I identify a mushroom becomes manageable if you follow a repeatable process. The goal is to move from a broad category to a shortlist of candidates, and to document signs that raise or lower confidence. Here is a practical sequence to use in the field and when you review photos later.
Work methodically: gather photos and notes, make an initial group classification, compare to local field guides or app suggestions, test simple non-destructive reactions, and decide whether you need a spore print or expert consultation. Each step should either increase confidence enough to act safely, or point clearly to the need for further verification.
- 1) Photograph these angles: cap top, cap margin close-up, underside (gills/pores), stem entire (include base), and habitat shot showing substrate and nearby plants.
- 2) Log context: date, GPS or general location, surrounding trees or grasses, recent weather, and whether multiple specimens are present.
- 3) Group the mushroom by growth form: gilled agaric, bolete (pores), polypore (bracket), coral, puffball, or cup. This eliminates many families quickly.
- 4) Compare five high-value features: cap shape/texture, gill/ pore structure and attachment, stem traits (ring/volva), bruising/latex, and spore print color if available.
- 5) Run low-impact field tests: cut the cap to check color reactions, carefully smell (don’t inhale spores), gently bruise a small spot and watch for color change; only perform tests you know how to interpret safely.
- 6) Use regional resources: match your notes against a regional field guide or detailed online keys; cross-check any app suggestions with at least two independent sources.
- 7) If an edible use is intended, require a second human expert verification and prefer local mycological club confirmation. Never rely on a single photo or a single app result before tasting or eating.
- 8) When accuracy remains uncertain, collect a specimen for expert review or take spore prints and photographs of the print on white and dark paper for color comparison.
Examples
Example 1 — A clear success: You find bright yellow, ridged, trumpet-shaped mushrooms on the forest floor in late summer under oaks. Photos show the decurrent folds (not true gills), a fruity apricot smell, and no ring. Those clues together strongly indicate chanterelles (Cantharellus spp.) for many regions; the folded hymenium and smell make false positives less likely. A confident ID here is reasonable from photos plus habitat.
Example 2 — A cautionary near-miss: A cluster of orange gilled mushrooms on a decaying stump looks like edible golden chanterelles at a glance, but close-up photos reveal true gills and sharp margins—traits of the poisonous Jack-o’-lantern (Omphalotus) or other lookalikes. In this case a high-resolution underside photo and noting growth on wood are the decisive details that prevent a dangerous error.
Example 3 — Where photos fall short: Two brown-capped agarics with similar size and gill color can be either edible Agaricus species or deadly Amanita variants when key base structures are obscured by soil. Without a clear photo of a volva or a spore print, the correct conclusion is that the mushroom cannot be safely identified from the available images alone.
Example 4 — When lab tests decide: Certain bolete groups require bruising and chemical tests, or microscopic spore shape, to separate edible from toxic species. A forager might record several photos and perform a spore print, yet still need an expert or lab confirmation for a definitive identification if the species belongs to a cryptic complex.
- Chanterelles: distinctive folded hymenium and smell—photos plus substrate are often sufficient.
- Jack-o’-lantern vs chanterelle: wood substrate and true gills separate lookalikes—underside photos are critical.
- Amanita safety rule: any white-gilled mushroom with a volva or ring should be treated as potentially deadly until proven otherwise.
- Boletes: pore color and bruising reactions often decide edibility; avoid porous mushrooms until you can check those reactions.
Limitations: what photos cannot prove about a mushroom
Photos and field notes have clear limits when answering how do I identify a mushroom. Visual similarity, intraspecies variation, and overlapping geographic ranges create uncertainty. Some species require microscopic features—spore size and ornamentation, cystidia shape, or hyphal structure—and those cannot be determined from macroscopic photos alone.
Another common limitation is that many important identifiers sit at the base of the stem or inside the fruit body—volvas, subtle base bulbs, or internal chambering—that are damaged or hidden in casual pictures. Spores and chemical reactions may be necessary to separate closely related species. Even experienced identifiers mark some identifications as provisional from photographs.
Safety limitation: never equate a probable identification from an app or photo with safety for consumption. Apps and images are powerful first passes but can be wrong, especially in regions with lookalike species. For any intention to eat a wild mushroom, get at least one independent expert confirmation, and prefer in-person verification by a regional mycological society or qualified mycologist.
- High-confidence photo IDs: conspicuous species with unique combinations of traits (e.g., Amanita muscaria’s red cap + white warts; puffballs with homogeneous interior).
- Partial or conditional IDs: when photos suggest a genus or group but key features (spore print, base, microscopic traits) are missing.
- Low-confidence cases: cryptic taxa, recent species splits, or local lookalikes where photos alone cannot separate species.
- When to escalate: if the mushroom is white-gilled with a volva/ring, or if you plan to eat it—seek expert, in-person verification.
Related guides
Use the app to act faster on your mushroom observations
When you’ve recorded the photos and notes above, Mushroom Identifier: Fungio can help you prioritize the most likely matches and highlight the field marks that need follow-up. The app is a fast first-pass tool to turn your photos into a focused checklist and suggested next steps—but treat any app result as provisional and confirm with a field guide or expert before acting on safety-sensitive decisions. Download Fungio on iOS to streamline your photo checklist, get context-aware suggestions, and learn which next checks matter most.
Take the next step →Frequently asked questions
Can I identify a mushroom from a single photo?
Sometimes—but often not. A single high-quality photo can identify very distinctive mushrooms with unique traits (bright colors, unusual shapes, or unmistakable pores or gills). However, many mushrooms need multiple angles and context: the underside, the stem base, and habitat notes are frequently decisive. If you only have one photo, use it to narrow possibilities and flag whether you need additional images, a spore print, or expert review. Treat any single-photo ID as provisional unless the species has unmistakable, documented field marks.
What photos and notes should I always capture in the field?
Take a consistent set of images: (1) top-down shot of the cap, (2) close-up of the cap margin and surface texture, (3) the underside showing gills/pores/spines, (4) the whole stem including the base (dig a little soil if necessary to reveal a volva), and (5) habitat context showing substrate and nearby trees or plants. Record date, location, substrate (wood species if known), and whether specimens are clustered or solitary. If you can safely perform non-destructive checks—like smelling or a gentle bruise reaction—note those too. These photos and notes dramatically increase the chance of a correct ID.
How reliable are mushroom identification apps?
Apps are useful for quick, exploratory suggestions and for learning what field marks to check, but their confidence varies by species and region. An app that returns several candidate names with explanation of the matching features is more helpful than one that gives a single label without justification. Use app suggestions as a first pass: cross-check them with regional field guides or an expert, especially for edible or potentially toxic species. Remember that image-based algorithms can be misled by stage of growth, lighting, or partial views.
What should I do if I think a mushroom is edible and want to be sure?
Do not taste or eat based on a photo alone. First, gather full documentation (photos, spore print, habitat notes) and compare them against at least two independent authoritative sources—regional field guides or keys are best. Next, seek in-person confirmation from a local mycological society or a qualified mycologist. If that isn’t available, don’t consume the specimen. When the species is part of a known toxic lookalike complex (for example, certain Amanita-like or Gyromitra-like groups), prioritize expert lab verification before any use.